Tournage and Stocks: How to Channel OCD into Acceptable Culinary Pursuits

Tournage vegetables

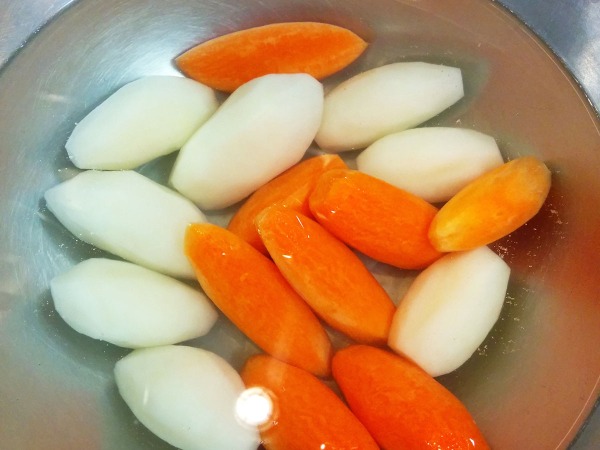
After last week’s lesson on taillage vegetable cuts, we reconvened for the quintessential skill of tournage, or turned vegetables. Essentially, you have to cut pieces of vegetables into blunt footballs. “For tonight, don’t worry too much about the number of sides,” said Chef Ray, “but traditionally there are seven sides to each turned vegetable. And remember, you have to use your wrists to curve around the vegetable.” He demonstrated and in just a few deft moves, he held up a perfectly shaped cocotte out of a shower of carrot trimmings.

In concentrated silence, we began turning our own vegetables. My knife zipped through the soft potato, ending precariously close to my thumb on the other end. “Use your wrists,” said Chef Janet, “and when you get home, practice by running a paring knife over an egg. That’s the kind of curved motion and shape you’re looking for.” I cut some diamond-shaped pieces, some flattened pieces, some cylindrical pieces. My fingers began cramping from the unusual knife position. You have to choke up on the paring knife blade and hold it pretty tightly with your index and middle fingers while your wrist guides the motion of the blade. My partner asked my opinion on his cocotte and I replied that it was pretty good, much better than mine.

Between cuts, I was rinsing off my knife to clear the trimmings. Chef Janet stopped by to check on our station and said, “You don’t have to clean off your knife between cuts, just let them fall off naturally. That will save you some time, there’s no need to be anal about it.” I looked at her with some amusement. “Wait, you realize that you’re telling me not to be anal as we cut vegetables into 7-sided footballs?” Chef Janet laughed and said, “Ok good point, be selectively anal about the right things!” On the other side of the station, my partner cracked up and couldn’t stop laughing for a few minutes. I went back to whittling lumpy eggs from my carrot.

Then, it clicked. Rather than starting from one end of the vegetable and cutting through to the other end (as instructed), I could simply start halfway down the vegetable, cut, and then rotate the piece 180 degrees and finish the other side. It would take twice as many cuts, but my results were much more uniform. For the first time, I could visualize exactly where to cut to get the shape that I wanted. Suddenly, I felt like a sculptor, manipulating my knife with confidence and power. At this point, Chef Ray was calling for everyone to clean up, since most of the class was almost done. I was behind and raced to finish my last four pieces of turnip. When I dropped the last pieces on my cutting board for appraisal, Chef Janet examined them and said, “Pretty good!”

Garniture Bouquetiere

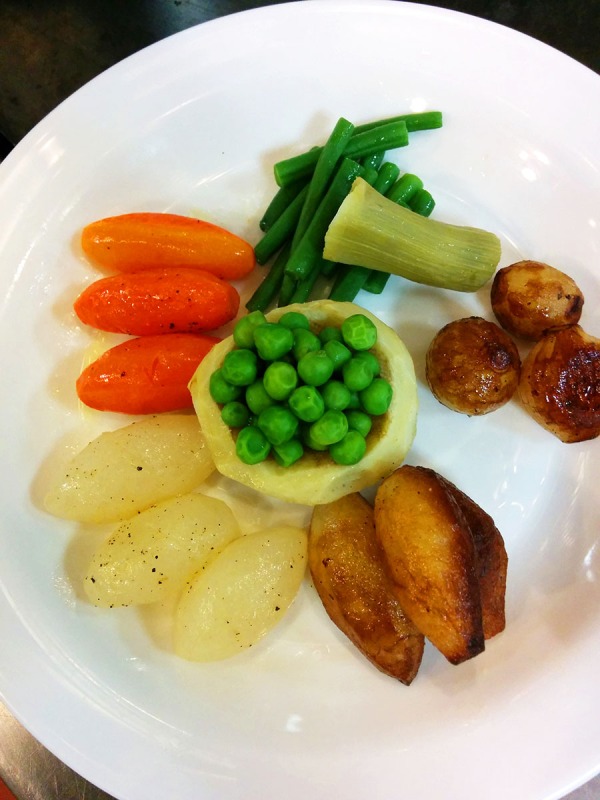
By the end of class, we’d cut and cooked all the vegetables for a traditional garniture bouquetière: artichoke hearts, peas, string beans, carrots, potato, turnips, pearl onions. It was a plate of 7-sided vegetables with a total of seven vegetables, a dish that usually accompanies a roast or meat dish. It may look simple but each of these elements is cooked in a particular way, designed to ensure they express their best flavors and look gorgeous to boot. For instance, the potatoes are cooked three times: blanched in salted water, sauteed over high heat, and roasted in an oven with butter. The entire time I kept thinking, is it really worth cooking these same potatoes three different times? But the end product was incredible, a cloud of creamy mashed potato on the inside and crispy edges on the outside. These were the best potatoes I’ve ever made, and it really hints at the gulf between home cooking and fine dining, and the technical prowess required to execute the latter.

Roasted veal bones

The next class was Stock Day. As a class, we made marmite (beef stock) and veal stock, and in teams of two, we each made chicken stock and fish stock (fumet). The overarching goal of stock making is to extract desirable flavors (no masking flavors like garlic) and to remove impurities (remove blood, foam and excess fat). I’ve made “stocks” before, mostly consisting of vegetable scraps and leftover bones from roast chickens, but I’ve never had the breadth and quantity of ingredients to make a truly top-notch stock. “Now remember, you never add salt to a stock, you never cover a stock, and you never stir a stock,” said Chef Ray. “Stock should be clear at the end, not cloudy.”

Veal stock in progress

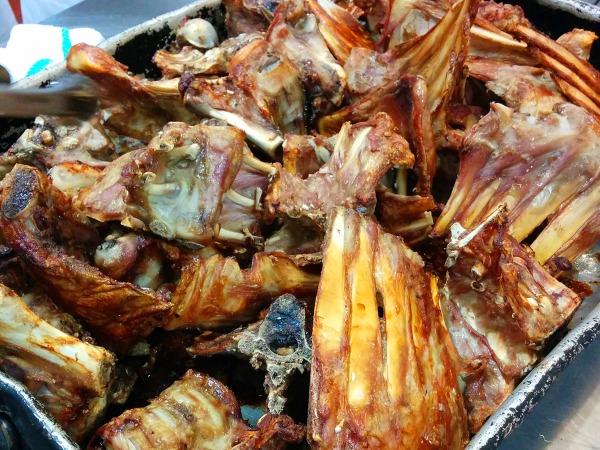
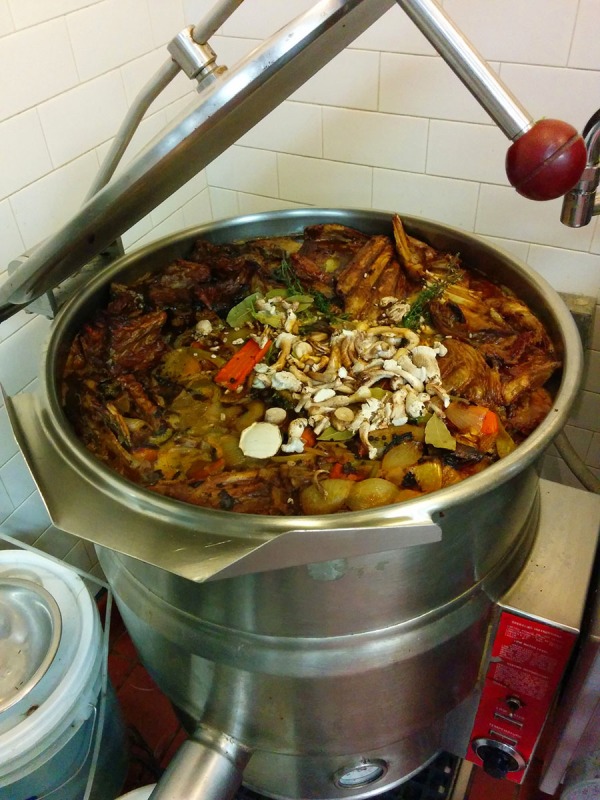
For veal stock, you begin by roasting bones until they are golden brown. The smell of roasted veal bones soon filled the air, and we all inhaled deeply. Next, you roast your mirepoix (carrots, onions and celery), using the moisture from the vegetables to deglaze sucs from the bone roasting pans. Everything gets combined with cold water, and then all that’s left to do is to skim the foam off the top occasionally while the pot simmers, and wait for 8-12 hours. Luckily, Chef Janet would be present to help strain and cool our stock, so we wouldn’t have to be there in the morning. I gazed at our 80 gallons of veal stock, burbling away in a steam kettle. It was a thing of beauty.

Fish stocks are much more delicate and only require 20 minutes or so of simmer time. Each team was handed 3 sets of flounder bones and tasked with cleaning them. I’ve never cleaned a whole fish before, and I looked at my partner with trepidation. “Uh, did you see how Chef cut out the gills? Because I still have no idea where the gills are,” I said. My partner swooped in to the rescue, “Oh, they’re right here, see these red ridges? I go fishing a lot, so I’m pretty familiar with fish.” I snipped out the gills with kitchen shears, then scraped out the rest of the fish roe, heart, stomach and other entrails. It reminded me of biology dissections, except I have no desire to eat frogs in formaldehyde. Next, we cut up mirepoix (onion, celery, white leek, mushroom; no carrot to retain the purity of the stock color), sweated our vegetables in butter, and added the bones and water.

After we simmered our fumet, we let the stock settle, then used tongs to carefully lift out bone and vegetable solids from the top and slowly ladled out the stock into another container. This avoids agitating the sediment at the bottom of the pot. The final 1″ or so of the liquid in the stockpot was simply tossed. All of the stocks were chilled and frozen; we would be using them as a class for the remainder of the course.

Next week: sauces and legumes.
Lesson 1: Who Knew Cutting Vegetables Could Be So Complicated?

In the locker room, we carefully unpacked the contents of our tote bags. Crisp white jackets with cloth knot buttons, wide-legged houndstooth pants and a cap to keep stray hairs in place. I carefully slipped the knots on the jacket in and out of the loops; it was a long, laborious process. “Wait a minute,” said the girl down the aisle, “The jackets are big enough that you can put them on without untying the buttons!” At the bottom of my bag, a neatly folded triangle of white cloth remained. “Is this a side towel? Or a napkin?” I asked. “Actually, I think it’s the neckerchief,” another student replied. “But I have no idea how to tie it on.”

I decided to shove my neckerchief in my pocket and go into the hallway, where the rest of my classmates were waiting. Some were chatting, some pacing, others taking selfies with their phones. Photos of famous chefs loomed behind us, and the Wall of Fame on the opposite side was decorated with the hand molds of renowned chefs. Eric Ripert, Thomas Keller, Bobby Flay and more. It was a reminder that the ICC is a living museum of food industry titans. Would any of us be future culinary superstars?

Inside our designated kitchen, Chefs Ray Dawson and Janet Crandall greeted us with smiles. Chef Ray introduced himself and explained that while we were off to a late start on the first day, he would expect us to be prompt in the future. “When I ask you to do something, you should show that you understand by responding, ‘Yes, Chef!’ Is that clear?” he said. “Yes, Chef!” we chorused. He began by guiding us through the proper way to tie our neckerchiefs. Cross the right hand over the left, switch hands, bring the right side over, loop it under and inside the knot. Let’s hope I remember how to do this next week.

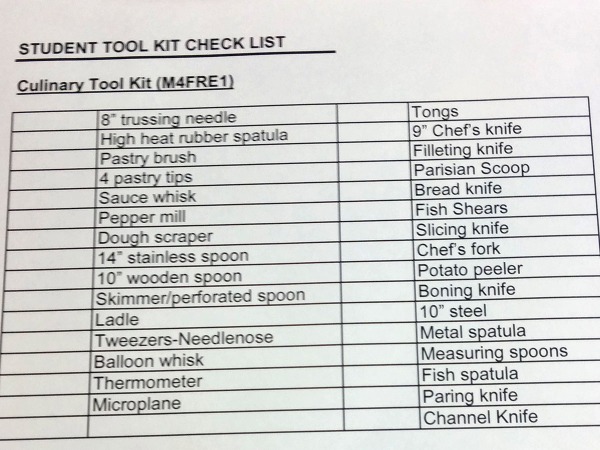
“Some of you will get cut,” Chef Ray continued. “Some of you will get burned. Don’t be embarrassed, just tell us immediately and we’ll decide how to help you.” He began explaining each of the knives and tools in our kits. A chef’s knife, a slicer, a serrated knife, a boning knife (sturdy and firm), a fish knife (thin and flexible). A channel knife for citrus twists. Tweezers for removing fish bones. A Parisian scoop, aka a melon baller. It was as if Christmas had come early! I suddenly had tons of tools that I’d always wanted but couldn’t justify buying. In the corner of the room, a student cut himself while removing a knife from its guard. Chef Janet rushed over with a bandaid.

“Let’s talk about equipment,” Chef Ray continued. “This is a half sheet pan and a full sheet pan. This is a hotel pan, and these are square boys. You can fit 6 of them into a hotel pan. This is a russe (straight-sided sauce pan), this is a marmite (tall stock pot) and this is a sautoir (sloped sauté pan).” Although the school had changed its name away from being the French Culinary Institute, it was evident that French conventions were still the rule.

Taillage

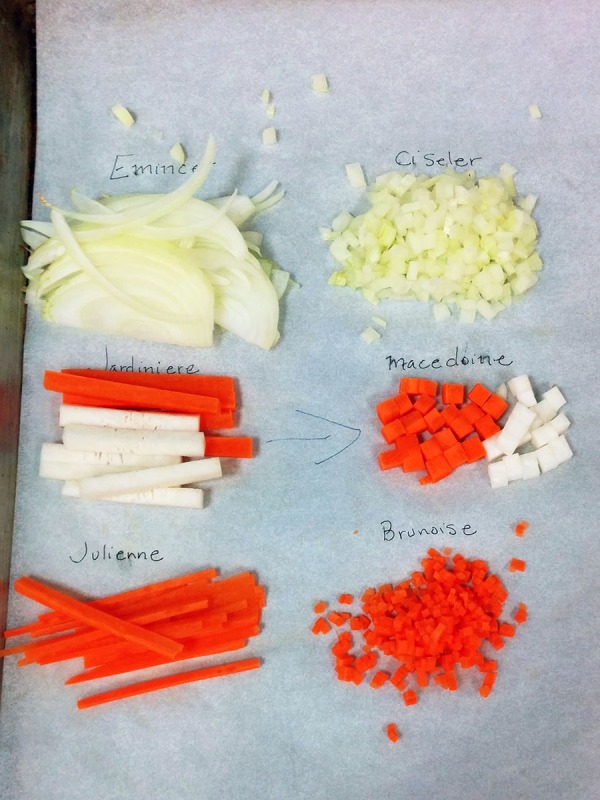
After more warnings about the importance of sanitation (“do not use your fingers to taste something”) and safety (“you’re probably going to burn yourself in this class”), we launched into taillage, the art of uniform knife cuts. “Why is this important?” asked Chef Ray. “Two reasons: aesthetics and even cooking. The food will look great and be done at the same time.” He went on to expertly dice and mince a series of onions, carrots and turnips into precise pieces.

It was our turn to try out our new knives. I’ve been using a thin, straight, single-edged Japanese knife at home, so picking up a Western-style chef’s knife felt bulky. “Try to slice in a single motion instead of sawing back and forth,” said Chef Janet, as I struggled to ciseler my onion. Next, I tackled the carrot, squaring off sections and cutting rectangular tranches. Each tranche must be cut into long strips, then diced into uniform cubes. I showed my macédoine to Chef Ray. “Not bad,” he said, “but these are a little uneven, and a little too small. You’ll get there!”

I began trimming my vegetables more aggressively to get the most uniform shapes possible. My hefty turnip was soon whittled down to a small handful of fine brunoise cubes. “Well done!” said Chef Janet. The pile of vegetable trimmings left over was immense. I realize that I am an amateur at this, but I can only imagine that fine dining kitchens still generate a large amount of waste food scraps. At the ICC, we carefully saved all the onion and carrot trimmings for making stocks, however all of the turnip pieces went to compost because there was no way to use so many turnips.

We took a break for dinner, cooked by the level 4 students, then returned for the second half of class, a demonstration of cooking à l’anglaise (ahead of time) and à la minute (on the spot). As my partner and I were cooking our second batch of carrots, we left a pan on the burner for a little too long. When he added the carrots to the pan, the butter flared up and flames shot toward the ceiling. My partner’s arm shot out and he twisted the burner knob down. The flames subsided and I looked around. Neither of the chefs had noticed, and the carrots didn’t seem any worse for being lightly flambéed. We presented our plate to Chef Ray, and I apologized for the carrots being underseasoned. “I think they’re seasoned fine actually,” he said, “however, do you see this butter pooling on the bottom of the plate? We’re not focusing on presentation yet, but in the future, you would want to drain the carrots on a paper towel to prevent that.”

Next week: stocks, sauces, and inventing a square turnip.

So You Think You Can Cook: Signing Up for Culinary School

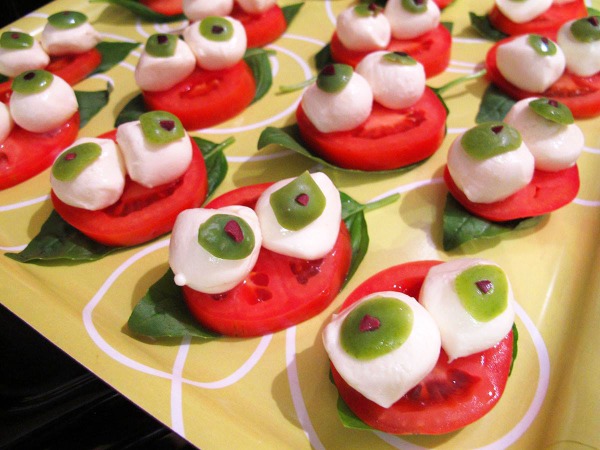
A Spooky Eyeball Caprese

For a year while attending the University of Gastronomic Sciences, I was constantly asked, “How’s culinary school? Are you going to be a chef?” I would patiently explain that no, that’s not really what gastronomy is about.

Don’t get me wrong, I spent A LOT of time cooking during that year, with some of the freshest, most affordable produce I’ve ever seen in my life. Our class potlucks were lavish, internationally diverse and subtly competitive; everyone worked hard to bring their A-game to the table. Since coming to New York (land of take-out and tiny kitchens), I have yet to be surrounded by cooks in the same intensity and density.

Lately, I’ve been mulling over what it means to holistically understand food, from seed to table, and it’s clear that while I can certainly eat and criticize plates in front of me, I don’t have the foundational knowledge that a chef holds about how to build a dish. I can follow a recipe and have cranked out some impressive pieces in the past, but it feels derivative rather than truly creative.

So it’s time to go back to school, this time for the subject that everyone assumes I’ve already covered. New York’s leading culinary schools include the International Culinary Center (formerly French Culinary Institute) and the Institute of Culinary Education. I was looking for the most rigorous program I could get, without committing to a year-long culinary program. After all, I don’t intend to become a full-time chef (so far). After some research and speaking to a friend who went through the program, I settled on the Culinary Techniques course at ICC. It’s a 110 hour program, and I’ll be taking the classes after work, twice a week from 5:45-10:45 pm. The most attractive part is that it’s essentially equivalent to the first level of the culinary program at ICC, and you have the option to transfer into the professional program if you pass an entrance exam.

They’ll be handing me knives and chef whites when the first class starts on Thursday. Let’s hope I’m not the first person to cut themselves!

Myself in Notes, 2014

DIG_E_2013_Twice_Militant_06_PS4
This list was inspired by Lorraine Hansberry’s series of birthday notes, written annually from when she was 23 to 33. You can see these candid, intimate glimpses of her life on display at the Brooklyn Museum until March 16th.

I love:
The Park Slope Food Coop
My office “family”
Learning obscure skills (blacksmithing)
Traveling to foreign countries
Efficiency (though not at the cost of human relationships)
Handwritten letters, and making time to write them
Carbs: bagels, pizza, pasta, rice, beer
Biking year-round
Lucky Peach
Sherlock Holmes (BBC)
Being fit
Being alone
Sleeping on the floor
Brooklyn

I’m bored with:
My glasses
Hunter x Hunter
Game of Thrones books
Swiss chard
Marijuana
Trying and failing to get Cronuts

I hate:
Not being able to recognize people readily (face blindness)
Cockroaches in my building
Too damn high rent in NYC
Oxford commas
Mixed signals
Being lonely

I’m proud of:
My ability to emotionally move on (after a breakup)
My ability to physically move on (since everything I have can fit into one car)
My family, who accomplishes crazy feats, feeds me well and behaves with rational insanity
Friendships, many of which hit their 10-year anniversary last August
Decisiveness, ripping off bandaids and not looking back
Zen, achieving inner peace when NYC tries to make that impossible

I wish:
To again write words that will spur laughs, inspire wonder, incite anger or change lives
To evolve from being a cook to a chef
To live in East Asia someday (Hong Kong?)
To be in love again someday

Forty North Oyster Farm: Surviving and Thriving Post-Hurricane Sandy

In the fall of 2012, Forty North Oyster Farm had just begun planting their first crop of oysters. Mere days later, Hurricane Sandy hit the Eastern seaboard, destroying coastal towns and remaking the shoreline. “Of the 300 or so houses in Mantoloking, 50 or 60 of them were missing after Sandy,” said founder and farmer Matt Gregg. “We were cleaning up plastic and debris for months, and it was incredible how the contents of people’s lives were scattered all across the bay.”

One year later, the farm has certainly gone through growing pains but is stronger than ever after the disaster. Matt is expecting his first commercial oyster crop to go to market next spring, and looks forward to sharing his oysters with diners and chefs. He recently added a new partner to the Forty North team, NYC restauranteur Chris Cannon, who will be opening a new restaurant in Morristown next spring. Located inside the historic Vail Mansion, the restaurant will feature Forty North as the house oyster. It is a well-deserved coup for the farm after a rough year.

Last weekend, the NY Oyster Lovers Meetup took a field trip to Forty North Oyster Farm to meet Matt and his partners Scott and Serafina. The drive to Mantoloking was scenic, though if you looked closely, you could see oddly placed sand dunes and abandoned boats, the reminders of Sandy’s power.

We began with a hike through Forsythe Wildlife Refuge, a network of coastal wetlands and marshes. Hawks flew overhead the flame-tipped trees, as we made our way toward the water. Here too there were souvenirs from the hurricane: random planks, lattice fencing, plastic lids and more.
Continue reading Forty North Oyster Farm: Surviving and Thriving Post-Hurricane Sandy

Recipe: Takoyaki Octopus Balls

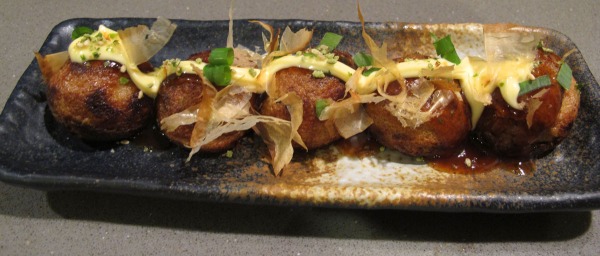
When you think of Japanese food, sushi may be the first thing that comes to mind. But the world of Japanese street foods and bar snacks is just as eye-opening and tasty, while eschewing less accessible ingredients like bluefin. One of my favorite dishes is takoyaki, or octopus balls. These are typically cooked in massive hot plates at street stalls and festivals. In Japan, it’s not unusual to see just one chef deftly turning, cooking and serving dozens of takoyaki in a matter of minutes—the speed is truly remarkable! After watching these takoyaki masters at work, I began to wonder how I might replicate the dish at home.

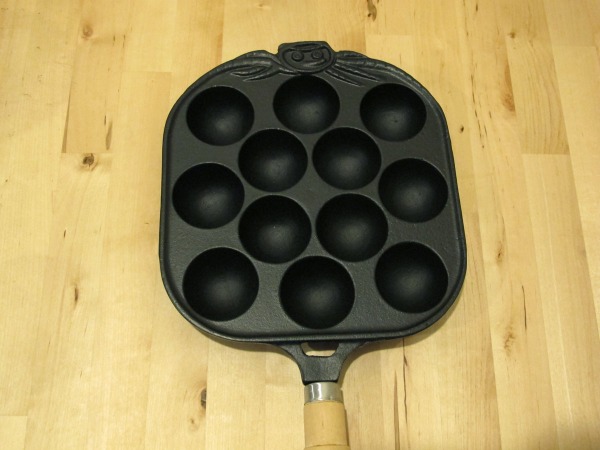
First, you start with a takoyaki pan. If you have gas burners, I recommend this reasonably priced cast iron takoyaki pan, which even comes with a smiling octopus at the top. There are also electric pans which you can use on any counter top, though they do take up a bit more storage space. Also, if you are concerned about cluttering your kitchen with single-use kitchen items, just think of what else you could make in balls, like Danish aebleskiver (puffed pancakes) or donut holes!

Having already tenderized and cooked an octopus, I simply diced an arm into pieces and prepared the batter. The batter is fairly simple, mostly flour, water and egg with some dashi powder (Japanese soup base made with dried fish flakes and seaweed). If you don’t have dashi, you can substitute some chicken bouillon powder. The batter should be thin, so don’t be concerned if it’s quite runny.

A few more tips: be sure to generously oil the surface and holes of your takoyaki pan. You want to be able to flip the takoyaki balls easily, so this is important. Also, if you try to rotate your takoyaki balls and they seem sticky, they probably haven’t developed a firm crust yet. If you wait another minute or two, the takoyaki usually firms and becomes easier to rotate. Finally, if your takoyaki aren’t perfectly spherical or come out looking like Pac-Man, fret not. Once you douse the balls with sauce, seaweed and other garnishes, it will still be delicious and no one will be able to tell the difference anyway.

Get the recipe after the jump:
Continue reading Recipe: Takoyaki Octopus Balls